Submitted by mdiaconescu on
In this multi-part tutorial we show how to develop Arduino-based apps for the Web of Things (WoT). This first part shows the very basics of an Arduino program (known as a "sketch") and provides a quick introduction to some electronic components, such as resistors, RGB LEDs and LEDs in general. In the following parts of this tutorial, which will appear every 1-2 weeks, we discuss how to read sensors, control actuators, and how to connect them all together in a Web of Things (WoT) network. Using standard Web technologies, such as HTTP and Web Sockets, we can then access the data or provide commands to the WoT nodes. As a newbie, it is helpful if you already have some basic C/C++ programming knowledge and understanding of some Web standards and programming languages, such as HTML and JavaScript.
Disclaimer: working with electricity is dangerous. For this project we'll use 5V, which is safe for the human body under any environment conditions. However, the low voltage may be obtained from a mains connected power brick, and therefore we highly recommend you to take safety precautions and to use a trustful brand for the power supply. We cannot be held responsible for any caused damage! Do it at your own risk and/or ask help from an electronics engineer. In case you are using the USB connector from your PC to power the Arduino board, be aware that short-circuits which may occur on the Arduino board may also have a negative impact on your PC!
Credits: some of the images from this tutorial are created by using Fritzing, a nice electronics modeling tool for beginners.
Download Source Code
The Arduino Story
The name Arduino comes from a bar in Ivrea, Italy, where some of the founders of the project used to meet. Today, this term is well known as referring to a project and a community.
All started when Hernando Barragán, a Colombian student, created the development platform Wiring as his Master thesis project in 2004. The goal was to create low-cost, simple tools for non-engineers to create digital projects. The Wiring platform consisted of a hardware PCB with an ATmega128 micro-controller, an integrated development environment (IDE) based on Processing, and library functions to easily program the micro-controller. In 2005, Massimo Banzi, with David Mellis (then an IDII student) and David Cuartielles, added support for the cheaper ATmega8 micro-controller to Wiring. The two forked the Wiring source code and started running it as a separate project, called Arduino. The Arduino's initial core team consisted of Massimo Banzi, David Cuartielles, Tom Igoe, Gianluca Martino, and David Mellis.
The project is based on micro-controller board designs, produced by several vendors, using various micro-controllers. These systems provide sets of digital and analog I/O pins that can interface to various expansion boards (also called 'shields') and other circuits. The boards feature serial communication interfaces, including Universal Serial Bus (USB) on some models, for loading programs from personal computers. For programming the micro-controllers, the Arduino project provides an integrated development environment (IDE) based on a programming language named Processing, which also supports the languages C and C++.
The first Arduino was introduced in 2005, aiming to provide a low cost, easy way for novices and professionals to create devices that interact with their environment using sensors and actuators. Common examples of such devices intended for beginner hobbyists include simple robots, thermostats, and motion detectors.
Today, there is a large number of various types of Arduino boards. They are different in hardware capabilities (MCU type, RAM size, number of I/O pins, size, etc), but they all share a common IDE and programming language.
The Arduino IDE is not the only way, and not necessarily the best way to program an Arduino development board. However, it is by far the easiest way to start with Arduino, and enter the world of Do it Yourself control. It supports the whole multitude of Arduino boards, and internally takes care of all the software and hardware variations, leaving as the only important task the writing of an "almost" hardware-independent program.
Contents of this Tutorial
The following main topics are discussed:
- How to write the first Arduino program.
- What are (RGB) LEDs and how to use them.
- Using the RGB LED as single color indicator.
- Use PWM (pulse width modulation) to emulate analog voltages and create "real" colors with the RGB LED.
Prerequisites
For this project we need the following software and hardware components:
- The official Arduino IDE.
- An Arduino/Genuino UNO R3 or Arduino Nano 3.x board. Other Arduino boards (MEGA2560, Micro, Mini, etc) work as well, but some of the instructions may be slightly different.
- An RGB LED. For this tutorial we'll use a common cathode one (common GND pin for all three LEDs).
- Three resistors: 2 x 330Ω and 1 x 220Ω.
- A breadboard and a few jumper wires.
- A power supply for your arduino board (7 - 12V is recommended, 5.5/2.1 center positive connector). A simpler alternative for this project is to use an USB Type B Male connector (for Arduino UNO) or USB Mini A Male (for Arduino Nano), and power if from an USB port of your PC. That's required anyway, in order to upload the program to the Arduino board.
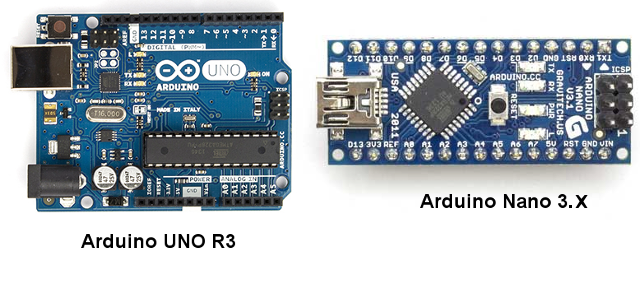
The Arduino UNO R3 board (see Figure 1) is equipped with the ATmega 328p MCU, running at 16MHz. It comes with 2KB of RAM memory, 32KB of flash memory (used for the program) and 1KB of EEPROM memory. Only 31.5KB of the flash memory is available, 0.5KB are used by the Arduino bootloader (a piece of software running on the MCU which allows you to easily upload the program to the board without the complications of a special programmer device). The board provides 14 digital input/output pins (of which 6 can be used as PWM outputs), 6 analog inputs, a power jack, an ICSP header (used to program the MCU with an external programmer) and a reset button. A maximum of 40mA (no more than 200mA in total) is provided by the board.
The Arduino Nano 3.x board (see Figure 1) is equipped with the ATmega 328 (or ATmega 328p for some clones) MCU, running at 16MHz. It comes with 2KB of RAM memory and 32KB of flash memory, and 1KB of EEPROM memory. Only 30KB of the flash memory are usable, 2KB are used by the Arduino bootloader. The board provides 14 digital input/output pins (of which 6 can be used as PWM outputs), 8 analog inputs and a reset button.
Note: Notice that some older versions of Arduino Nano (under version 3) comes with an ATmega 168 (or 168p for some clones), thus the amount of RAM, flash and EEPROM are half of the values available in the Arduino Nano 3.x.
What is a (RGB) LED?
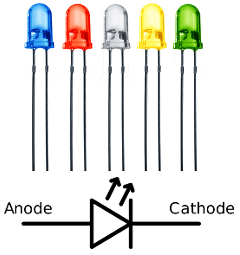
An LED (Light Emitting Diode) is a diode that emits lights when connected to a correct power source. LEDs comes in different shapes or colors, but basically they follow the same concept. Figure 2 shows various LEDs and the LED symbol used in electronic schematics. The cathode represents the negative pin, and in many cases this identifies with the circuit GND (ground). However, the negative and the GND of a circuit must not be confused, because they may or may not represent the same thing on a specific circuit. The anode is the positive pin, usually named VCC or simply +.
Node: in real physics, the electrons are traveling (thus creating the current) from the negative pol to the positive pol. However, in electronic diagrams, the symbols are used other way around, because earlier, when these symbols were created, there was no real way to know how the electrons are moving, therefore the scientist at that time believed that the electrons moves from the positive pol to the negative one.
An RGB LED (see Figure 3) consists of three individual (one red, one green and one blue) LEDs in a single unit. These LEDs come either with a common cathode (negative pin) or with a common anode (positive pin). This is important to know in order to wire it correctly to a circuit.
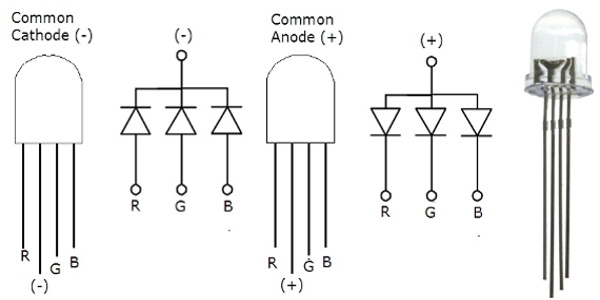
- Figure 3: Common Cathode and Common Anode RGB LED
A LED is a current controlled device, which means that it is important to
determine the amount of current flowing through the LED. A LED has a maximum
current specified by its datasheet, and when this information is not
available, for standard 3mm or 5mm LEDs, but not only, one can safely assume
20mA (0.02A) as the maximum value. Knowing the voltage applied to the LED
pins (e.g., 3.3V, 5V, 12V, etc), and the LED forward voltage, we can use the
Ohm's law, V = I * R, to determine the value of a resistor
which ensures that the maximum current is not exceeded. Thus,
R = V / I, where R is the resistence value in Ohms, V is the
voltage in volts and I is the current in amperes.
A resistor is a passive electronic component which restrict the amount of current passing through it. By analogy, a water tab is used to control the amount of water flow, so is the resistor, but instead of water, it controls the amount of electrons (thus the current) allowed to flow throug it.
The LED forward voltage is the the voltage level at which the led to starts to emit light (because it allows just enough current to pass trough). Common LED forward voltage values are: 1.7V for red, 2V for green and orange and 2.7V for white and blue.
For a value of 5V applied to the LED circuitry (which is the case with our Arduino UNO example), we can compute the resistor value for an red LED:
- Determine the voltage to be dropped outside the LED. This is the difference between the voltage applied to the circuit and the LED forward voltage. For the red LED this is: 5V - 1.7V = 3.3V.
- Decide how much current you want to allow passing through the LED. The amount of current determines the LED brightness. In general, half of the maximum specified current is just sufficient, which for a normal 3mm or 5mm LED is about 10mA (0.01A).
- Apply the Ohm's law:
R = 3.3 / 0.01, resulting inR = 330Ω.
Like with any LED, resistors are are required for the RGB LEDs, thus limiting the current and protecting the LED. For an RGB LED we need three resistors, one for each color. Following the above rule, we have:
- Voltage to be dropped outside the LED:
5V - 1.7V = 3.3Vfor the red LED,5V - 2V = 3Vfor the green LED, and5V - 2.7V = 2.3Vfor the blue LED. Therefore, the voltage to be dropped out is:V = {3.3V (red), 3V (green), 2.3V (blue)}. - Knowing that we need 10mA (0.01A) current applied to the LED, we compute
the resistor values by using the Ohm's law,
R = V / I. We obtain:R = { 3.3 / 0.01 (red), 3.0 / 0.01 (green), 2.3 / 0.01 (blue)},R = {330Ω (red), 300Ω (green), 230Ω (blue)}.
Resistors can be found in various values, but unfortunately not all the
resistor values we obtained above are standard ones. However, we can
approximate these values with the first lower or upper (whichever is
convenient for us) standard values, so we obtain,
R = {330Ω (red), 330Ω (green), 220Ω (blue)}. This means that
the real current passing through our LEDs is
I = {10mA (red), 9mA (green), 10.4mA (blue)}. It is possible to
use resistors in series or parallel (or both), to obtain more exact values,
or we can buy expensive resistors which have the exact value we need, but
there is no reason to do this if the purpose is just to have the LED
lighting up.
Note: we use a common cathode RGB LED, so the resistors are connected to the LED's anodes. Using a common anode RGB led requires to connect the resistor to LED's anodes, and also to make a few changes in the Arduino program.
The Basics of an Arduino Program (Sketch)
An Arduino program or sketch is essentially a C/C++ program. It comes with a set of methods (implemented in the core) which allows to control the Arduino I/O pins, communicate over UART, I2C, SPI or read analog values from a voltage source. Every Arduino code consists of the following (some optional) sections:
// 1) constants definition (optional if no constant is needed)
// 2) include headers for used libraries ( optional if no library is used)
// 3) define the global variables (optional if no global variable is required)

// program initialization
void setup() {
  // I will run just once, when board is powered on, or a reset signal is received.
  // I will also execute if you explicitly call me in the program, but please don't do that!
}

// infinite loop cycle
void loop() {
  // I will run again and again, in a loop, as long as the board is powered.
}
While the sections marked 1), 2) and 3) are optional, in most of the Arduino programs you'll use at least one if not all of them.
The setup method executes only once, when the Arduino board is
powered up or when a reset signal is received. This method contains
initialization code, such as set pin modes (we discuss later about this),
initializing serial communication and so on. The loop method,
as also suggested by its name, executes in an infinite loop. This method
contains the code that your MCU (micro-controller) executes again and again,
such as reading a sensor, or counting the elapsed time.
Compile and Upload an Arduino Program
While the above program does nothing, we use it to show how to compile and upload a program to an Arduino board. We mostly refer to Arduino UNO board, but the procedure for the other Arduino boards is very similar (one just need to chose the correct board from the IDE menu).
Open the Arduino IDE, then navigate to File > New top bar
main menu. Copy/paste the above code example, then navigate to
File > Save. Give a name (e.g., rgb_led) to
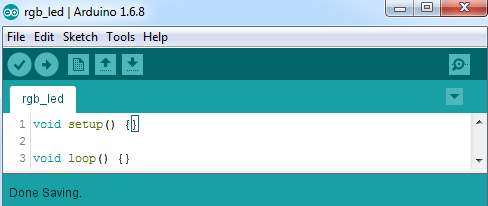
your program and then save it. You should have now a result as shown in Figure 4.
Navigage to Tools > Board and select Arduino/Genuino UNO. Last, navigate to Tools > Port and select the COM port associated with your Arduino Uno Board (usually is the only COM port in the list, or is the one that is not COM1). If all went fine, then expanding the Tools menu you should see something similar with Figure 5 (the COM port may be different, the rest must be the same).
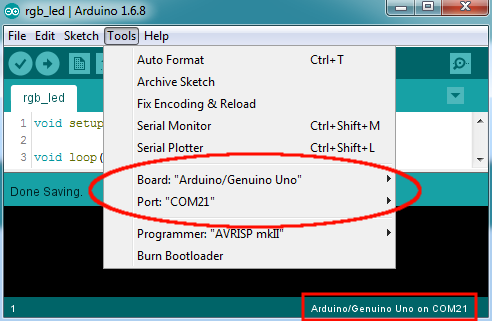
When using Arduino Nano 3.x, make sure to select the Arduino Nano from the Tools > Board menu. An additional menu is shown, Tools > Processor allowing to select 328 or 168 MCU. Selecting 328 works also on the clone boards using 328p MCU, and the same, selecting 168 MCU works also with some clone boards using the 168p MCU.
Last, we compile and upload the program to the Arduino UNO board (the procedure for Arduino Nano is exactly the same). This is achieved with a simple click of a button: the arrow button located in the top-left corner (as marked with a red circle in Figure 6). Alternatively, use the Sketch > Upload menu. If all went fine, you should see the "Done Uploading" text in the green bar, just under the sketch edit area (see the rectangle red mark in Figure 6).
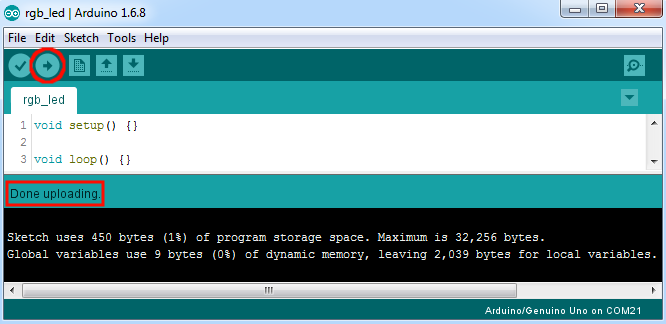
It is important to notice the information shown in the info area (black area at the bottom of the application interface). It states amount of flash memory used by this program (450 Bytes) and the amount of RAM used by the global variables (9 Bytes). You may wonder, why so much flash and RAM is taken for a program which does nothing? Well, this happens because there is some additional code, part of the Arduino core code that is compiled and added to the program, behind the scene.
Master the RGB LED: the Hardware Configuration
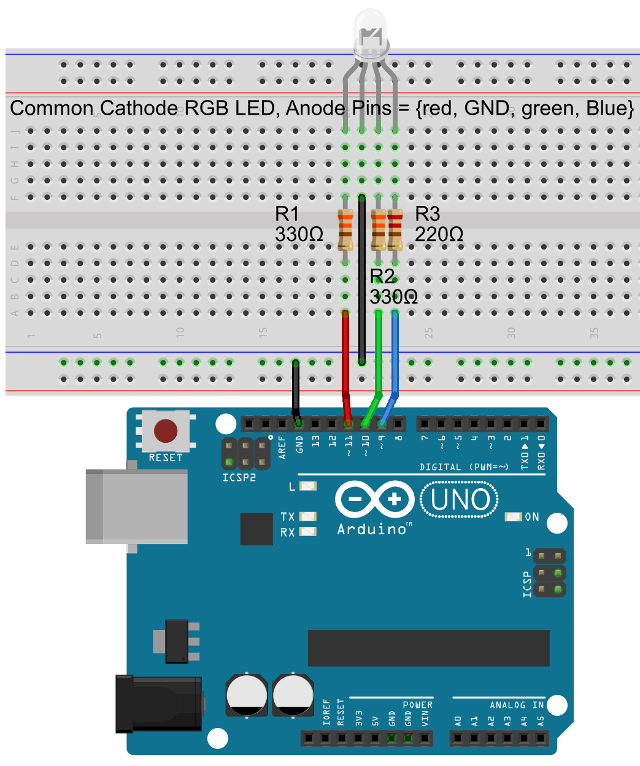
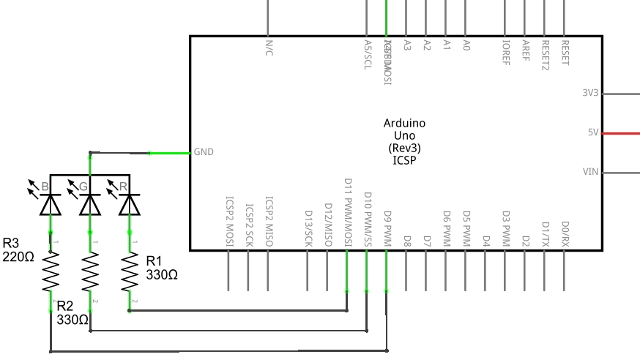
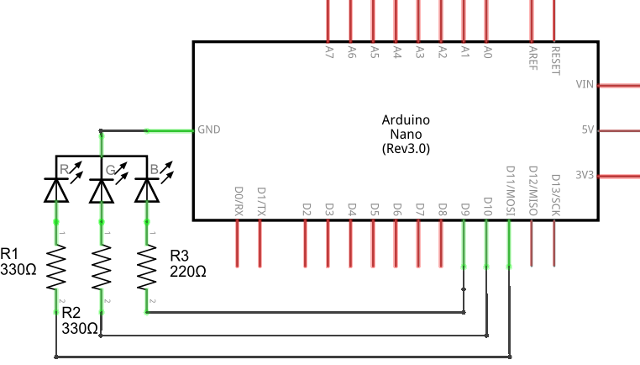
In Figure 7 is shown how to wire the RGB LED to the Arduino UNO board, by using the three resistors and a set of jumper wires. If you don't have a breadboard and also no jumper wires, you can use the resistor leads as wires, and connect them directly to Arduino UNO board header pin. While that's a kind of hack, it is easy to perform, and requires no additional components than the Arduino board, the RGB LED and the resistors. Figure 8 shows the schematics of the circuit.
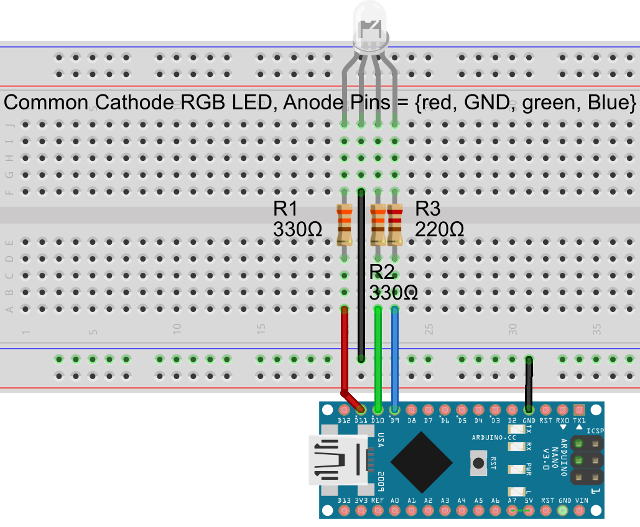
In Figure 9 is shown the breadboard arrangement for the RGB LED when the Arduino Nano 3.x board is used.
Master the RGB LED: the Software Configuration
In this section we show how to write an Arduino program, allowing to light up the RGB LED in various color combinations. Notice that the code is common for both, the Arduino UNO R3 and Arduino Nano 3.x boards, therefore when we say "Arduino broard" we refer to either of the two Arduino boards. In addition, the exact same sketch code will work in most of the Arduino boards.
Arduino I/O Capabilities
Controlling the RGB LED means to be able to individually light up each of the three component LEDs. That is, using some of the Arduino pins, we should be able to allow (or stop) the current to flow through the LED. Each Arduino board has a number of pins named general purpose I/O (input/output) pins. In addition, some of the pins are capable of analog input (ADC) or analog output (DAC or PWM). Finally, some of the pins have special features, as being able to communicate by using some standard protocols, such as U(S)ART (Universal (Synchronous) Asynchronous Receiver/Transmitter), SPI (Serial Peripheral Interface) or I2C (I square C).
Digital Output
A digital output pin is a pin that is able to change its state into HIGH (that is usually very close to the VCC value) or LOW (that is GND), whenever the running program tells it to do so. That means, we can write code, that allows to transform that pin into either a VCC or GND connection. In simple words, inside the MCU there are transistors (some miniaturized as electronic switches), able to bound the pin either to VCC or to GND.
It is important to notice, that while your power supply used for the Arduino board may be able to deliver a lot of current, (maybe 500mA via an USB 2.0 port or more tha 1A from a power brick supply), each of the Arduino pins are only able to support up to 40mA. So we can use an Arduino pin to light up a LED (we saw that this means about 10mA per LED) or transmit a signal, but it is NOT possible to power up a motor or an electromagnet in this manner. Ignore this rule and you'll either have a dead pin or a even a dead Arduino board. Also, the total current (for all the pins used at a moment in time) must not exceed 200mA. Notice that these values are already maximum values, and should not be used for long time. Use values under 80% of these maximums to be in a safe margin and protect your board.
In this section we've used a few new terms:
- Digital
- it refers to a signal which can be either LOW (equivalent of binary 0) or HIGH (equivalent of binary 1). A sequence of such states can be interpreted as a set of binary data, used to communicate with a digital device, using a communication protocol.
- HIGH
- is a digital state, where the voltage level is close to VCC.
- LOW
- is a state, where the voltage level is close to GND.
Please note that while in many cases HIGH refers to a voltage
almost equal with VCC, and LOW is a voltage level close to GND, this may be
different form case to case. For example, in some systems, HIGH may be equal
with VCC, but may also mean any voltage level in the inverval [VCC / 2,
VCC]. In the same way, LOW may mean GND, but also any voltage level in the
interval [GND, VCC / 2).
Digital Input
A digital input pin is a pin that is able to detect changes of HIGH or LOW coming from some external source. In other words, with an digital input pin we are able to "read" HIGH or LOW digital events, coming for example from sensors or other voltage sources. With a digital input pin we can't light up LEDs or power up devices.
Analog Output
An analog output pin is a pin which is able not only to transform to VCC or GND but also to voltage values in between. Such pins are not available for every Arduino boards, and they are named DAC pins (Digital to Analog Converter). For example, hardware DAC pins are available in the Arduino DUE board. A solution to emulate DAC with an Arduino board which does not have such built in capabilities, is to use a technique named PWM (Pulse Width Modulation). We discuss this topic later in this tutorial. Both, Arduino UNO and Nano boards have six pins capable of PWM output.
Analog Input
An analog input pin is a pin capable to detect voltage values within a range, which is usually [GND, VCC]. This is possible by using an internal ADC (Analog to Digital Converter) module, which is able to map the voltage level value in a number, representing the voltage quantity. This feature is very important and it is found in almost any Arduino board. Examples of using this feature are: analog sensors (provides a voltage level to tell you what is the measured quantity), voltmeters or ammeters.
Control the Individual Colors of the RGB LED
Using Arduino, we can light up individual LEDs by using Arduino digital output pins. Arduino digital pins are identified by using specific positive integer numbers, also printed out on the Arduino PCB board.
Setting an Arduino pin as Digital Output is possible by using the
pinMode method. It takes two arguments: 1) the pin number; and
2) a constant specifying the mode type: INPUT,
OUTPUT or INPUT_PULLUP. For our case, we need to
use OUTPUT.
We have used pin 9 to control the blue LED, pin 10 for the green LED and
pin 11 for the red LED, as shown in Figure 7 and Figure 9. Therefore, in the setup method, we
set these pins as digital output:
void setup() {
  pinMode(9, OUTPUT);
  pinMode(10, OUTPUT);
  pinMode(11, OUTPUT);
}
We like to implement the following LED effect: every of the three LEDs
lights in the sequence red, green then blue, and each time the LED stays ON
for about one second. To do that, we need to use some kind of "pause" in the
Arduino code. This is possible using the delay method, which
has one parameter, the number of milliseconds for the "pause". In addition,
there is another method, named delayMicroseconds allowing for
smaller pause delays, in the range of microseconds.
As we discussed, the loop method executes again, and again.
This is the place where our main code goes, and where we also like to use
the "pause".
void loop() {
  delay(1000);
}
To light up a LED, we'll need to enable (set HIGH) or disable (set LOW) the
corresponding Arduino pins. This is possible by using the
digitalWrite method, which has two arguments: 1) the pin
number; and 2) the state (HIGH or LOW).
void loop() {
  digitalWrite(9, HIGH);
  digitalWrite(10, HIGH);
  digitalWrite(11, HIGH);
  delay(1000);
}
Now all the LEDs are light up but they stay ON all the time. We can go one step further and using a counter, we can determine when is the time to turn the LED ON or OFF.
uint8_t step = 0;
void loop() {
  switch (step % 3) {
    case 0:
      digitalWrite(9, HIGH);
      digitalWrite(10, LOW);
      digitalWrite(11, LOW);
      break;
    case 1:
      digitalWrite(9, LOW);
      digitalWrite(10, HIGH);
      digitalWrite(11, LOW);
      break;
    case 2:
      digitalWrite(9, LOW);
      digitalWrite(10, LOW);
      digitalWrite(11, HIGH);
      break;
  }
  delay(1000);
  step++;
}
The result of the modulo operation step % 3 is 0, 1 or 2.
Thus for each of this value, we can assign a LED to be ON and all the other
to be OFF.
Homework: modify the code so that the red LED is on for one second, the green LED for two seconds and the blue LED for three seconds.
Now compile and upload the code to your Arduino board and enjoy the light show! If you are ready for more, then read further.
Use PWM to create "Real" Colors with an RGB LED
We have a new idea: lets use the three LEDs and create mixture of colors, as done by our monitors or TVs (which in a way, use the same strategy to create the colorful images we see). But wait, wouldn't this mean to create the monitor with the smallest resolution in the world: 1 pixel! That sounds cool, right?
Creating "real" colors, requires to find a way to obtain different levels of red, green and blue from our RGB LED. That will be possible if we are able to provide more (or less) current to the LED, thus obtaining various levels of brightness. From the hardware point of view, this means to either variate the resistor value or the voltage, thus controlling the current, which in turn determines the LED brightnes. But how do we do this via the Arduino code, since we don't want to use dozens or hundreds resistors, and we only have the 5V supply from our USB 2.0 port? Here is handy to have a DAC module, which will be able to transform a number into a voltage level. Unfortunately, we don't have one and the Arduino UNO and Nano boards come with no such built in module.
What is PWM Signal?
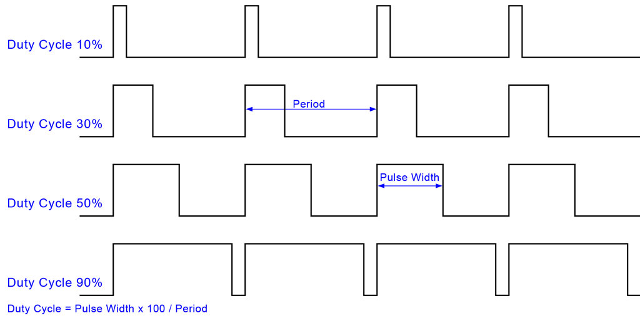
PWM describes a way to switch the voltage ON and OFF, for specific amounts of time, thus making the device connected to PWM output (e.g., the LED) to "think" that it actually gets less voltage.
Figure 11 shows how PWM works, with a square signal. A pair of LOW and HIGH signal is named period. The number of period repetitions in the interval of one second is named frequency. The amount of time from a period (measured in percent), for which the signal is HIGH represents the duty cycle.
The important aspects are the frequency and the duty cycle. The frequency
is somehow dependent on the device we try to "lie" about the voltage value.
Using too low frequency values, may not trick the device in believing that
it gets a lower voltage, or it may not work at all. The duty cycle
determines the voltage quantity that is saw by the device (e.g., the LED).
Normally, the duty cycle percent value from the real applied voltage, is
what the device "sees". E.g., duty cycle = 50%, real applied voltage = 5V,
then the voltage observed by the device powered device is
50% * 5V = 2.5V.
Arduino and PWM
Most of the Arduino boards comes with built in PWM capabilities. The PWM capable pins are marked with ~ (tilde). Now it is obvious that we didn't chose the pins at random. All the pins we use, 9, 10, an 11 are PWM pins. Depending on the used Arduino board, more or less such pins are available.
To use PWM in the software, the Arduino core code provides the
analogWrite method. It has two arguments: 1) the pin number;
and 2) the duty cycle value, expressed as a number between 0 (only LOW
signal for the whole period) and 255 (only HIGH signal for the whole
period). Notice that hardware wise, it is possible to have more than 8 bit
(thus, values from 0 to 255) PWM resolution, since some of the PWM pins are
16 bit PWM resolution capable. The number of bits defines the granularity of
the duty cycle.
The pulse frequency is different from board to board and from pin to pin. For example, Arduino UNO uses a frequency of 980Hz for PWM pins 5 and 6 and about 490Hz for the other PWM pins (i.e., 3, 9, 10, 11).
Lets now play with our LED and try to obtain all the color combinations we can get for 8 bit resolution. For this will loop each LED through each 5th PWM value, at an interval of 8 milliseconds, thus at about 125Hz so our eyes does not perceive the breaks. 30Hz suffices for our eyes, but then the change in color will be to slow and you need quite long time to see all the variations. The total run time, for every 5th PWM value, three PWM pins and 125Hz changing frequency on the most variable color (that's red in our case), is between 15 and 20 minutes.
void setup() {
  pinMode(9, OUTPUT);
  pinMode(10, OUTPUT);
  pinMode(11, OUTPUT);
}
void loop() {
  for (uint8_t i = 0; i < 250; i+=5) {
    analogWrite(9, i);
    for (uint8_t j = 0; j < 250; j+=5) {
      analogWrite(10, j);
      for (uint8_t k = 0; k < 250; k+=5) {
        analogWrite(11, k);
        delay(8);
      }
    }
  }
}
PWM does not represent a complete replacement for DACs, but is a solution when such (in general more expensive) modules are not available.
Some Points of Attention
While in this tutorial we only "played" with (RGB) LEDs, and just had some simple operations, we've gone through an important set of basic Arduino capabilities. Some other more advanced features, such as analog input or communication protocols (SPI, I2C, etc) are part of the future tutorials.
We brought in discussion only the Arduino UNO and Nano boards, but the
above shown code will work with most of the Arduino boards without any
modification. However, it is important to know that some Arduino boards,
such as Arduino DUE, uses 3.3V as input (VCC = 3V). Therefore,
the appropriate resistor values need to be recalculated. Also, some boards
have a lower maximum current value per pin, e.g., Arduino DUE allows a
maximum of 3mA or 15mA per pin, depending on the used pin.
In our code examples, the explicit number of the Arduino board pin was used. While this is easy to do with small programs, it becomes more and more difficult when your code grows. In such cases, but not only, since this is a kind of general recommendation, it is good to use constants. For example, instead of using 9 to identify the pin used to control the blue LED, we could have used a constant BLUE_LED, as shown in the example below:
const uint8_t BLUE_LED = 9;

void setup() {
  pinMode(BLUE_LED, OUTPUT);
}
Or even better, we can use the #define directive to obtain at
compile time a replacement of all the identifier occurrences with the
corresponding value:
#define BLUE_LED 9;

void setup() {
  pinMode(BLUE_LED, OUTPUT);
}
Using the #define directive has the advantage that it does not
take extra static memory. Learn more about how to deal with Arduino limited
RAM resources: Optimize Arduino Memory Usage.
This is not only a better programming style, but also allows to easily change the pin without a need to replace the pin number in multiple place of your code. We have used explicit pin numbers so one can make the relation between what is written on the Arduino board near each pin, and what you see in the code. However, starting from now on we'll use constants instead of "magic pin numbers".
Next Tutorial: Part 2 - Sensing with Analog and Digital Sensors
In the second part, we'll learn how to use various digital and analog sensors with an Arduino board. Specifically, we discuss the DHT22 (temperature and humidity digital sensor), the Grove (soil moisture analog sensor), PIR (passive infrared digital sensor) and HC-SR04 (ultrasonic distance measurement digital sensor). The release date of the second part is: before 21 April 2016.


