Submitted by mdiaconescu on
You may like to check our other WoT/IoT related articles.
Another Arduino Compatible Board?
You probably asked yourself a few times: what, another Arduino compatible board? Why shall I choose this one over the other one? Is this "the one" for my project?
If you are not familiar with Arduino, you shall have a look at the Arduino official website. You may also be interested in reading our WoT with Arduino for Beginners tutorials.
A simple answer for all or each of these questions does not really exist. A few other questions must be answered first: which features do I really need for my project? Is it battery powered? How much $$$ do I want to spend (or do I have available) for the project? Where do I buy the board? Does it have a "real" community? ... and so on.
The expectations: a new Arduino "compatible" board is also a progress step, so at least in theory it must have "something" that makes it "better" or at least "different". Many of these boards have just (some) minor hardware changes when comparing them with the equivalent Arduino brother, but their price is the one of a coffee cup, thus making them attractive for the very beginner or for low cost projects - this is also the case of many "Arduino clone" boards. Other boards have relevant hardware improvements, but usually (at least at the release time) have a higher price. Such boards have for example a better MCU (higher speed, amount of RAM and FLASH) and usually a larger features pack, like I2C, SPI, UART, CAN, touch sensor interface, ADC, DAC, etc. Finally, a few of them combine most of the goodies in a (very) tiny board and have the price of two beers or coffee cups. In the former category, we also find the Seeeduino XIAO board.
While XIAO is not necessarily "the perfect Arduino compatible board", it is among the few ones that for around five bucks, comes in a very low size, has a MCU capable of coping with demanding tasks, requires just a little amount of power, has 11 GPIOs that can be either used for digital or analog operations and supports a lot of the standard protocols. The compatibility with the Arduino IDE and many of the existing libraries is also very good, and in practice this means that it can be a replacement for the Arduino Zero (or its smaller brothers) board in many projects.
Technical Description and Features
A brief description of the most important features and technical characteristics of the XIAO board are provided in Table 1.
| Feature | Description |
|---|---|
| MCU | 32 Bit ARM Cortex-M0+ @48MHz |
| RAM | 32KB SRAM |
| FLASH | 256KB |
| GPIOs |
11
analog/digital
pins A0-A10 analog (-0.3 - 3.3V) D0-D10 digital (max. 7mA / pin) |
| DAC |
pin
D0/A0 10 Bit, 350ksps |
| ADC |
pin
A0-A10 12 Bit, 350ksps |
| UART |
TX: pin
A6/D6 RX: pin A7/D7 |
| I2C |
SDA: pin
A4/D4 SCL: pin A5/D5 |
| SPI |
MOSI: pin
A10/D10 MISO: pin A9/D9 SCK/SCLK: pin A8/D8 CS/SS: any GPIO but D8, D9, D10 |
| IRQ | all GPIOs support interrupts, but GPIO A5/D5 and GPIO A7/D7 cannot be used at the same time |
| PWM | available on pins D1-D10 |
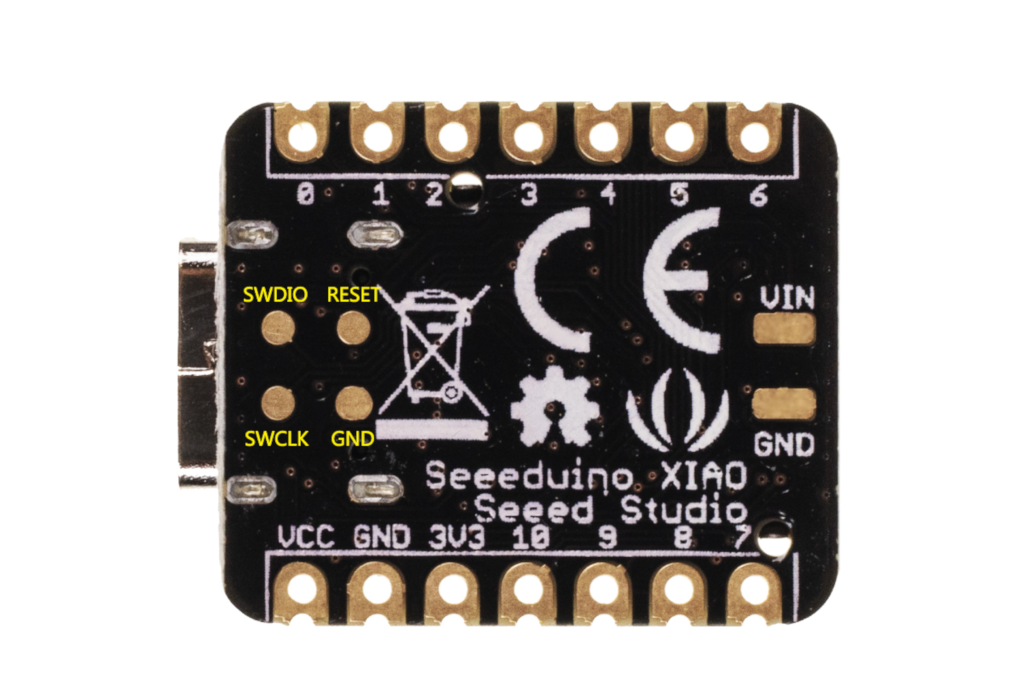
| SWD | Serial Wire Debug (SWD) is available as exposed pads on the back of the board |
| RTC | 32-bit Real Time Counter (RTC) with clock/calendar function but requires the board to be powered |
| Builtin LEDs |
one green
power
led one yellow user led two blue serial port LEDs |
| Power Supply |
Option 1: 5V
via USB-C
port Option 2: 4-6V via power pads Note: The power pads are on the back of the board (see Figure 3). |
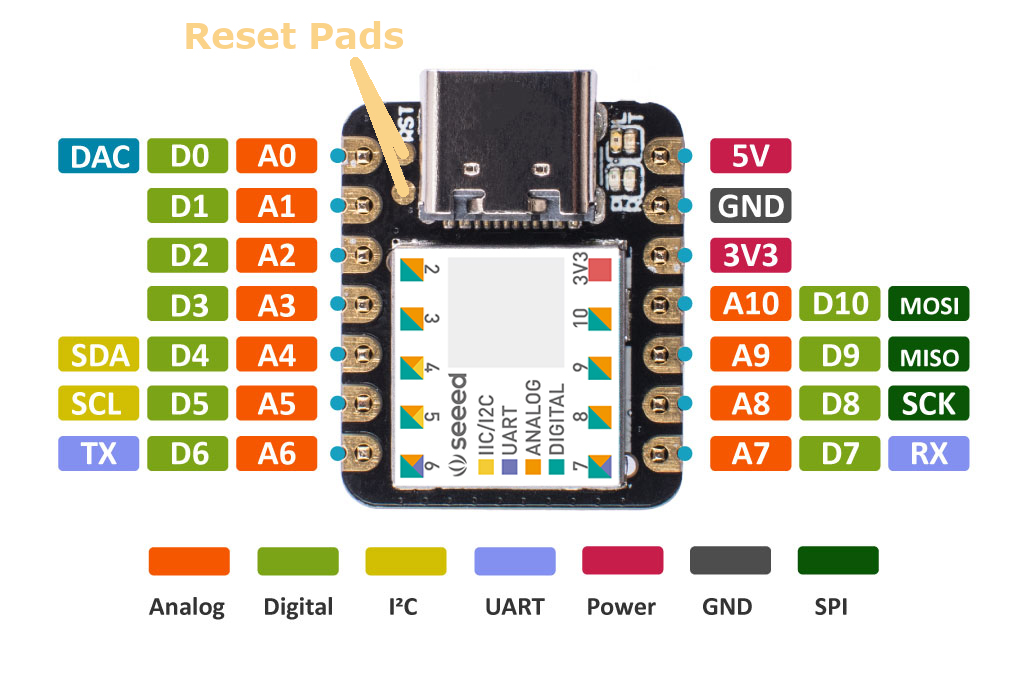
| Reset | exposed reset pads on the front (See Figure 2) and on the back (See Figure 3) of the board |
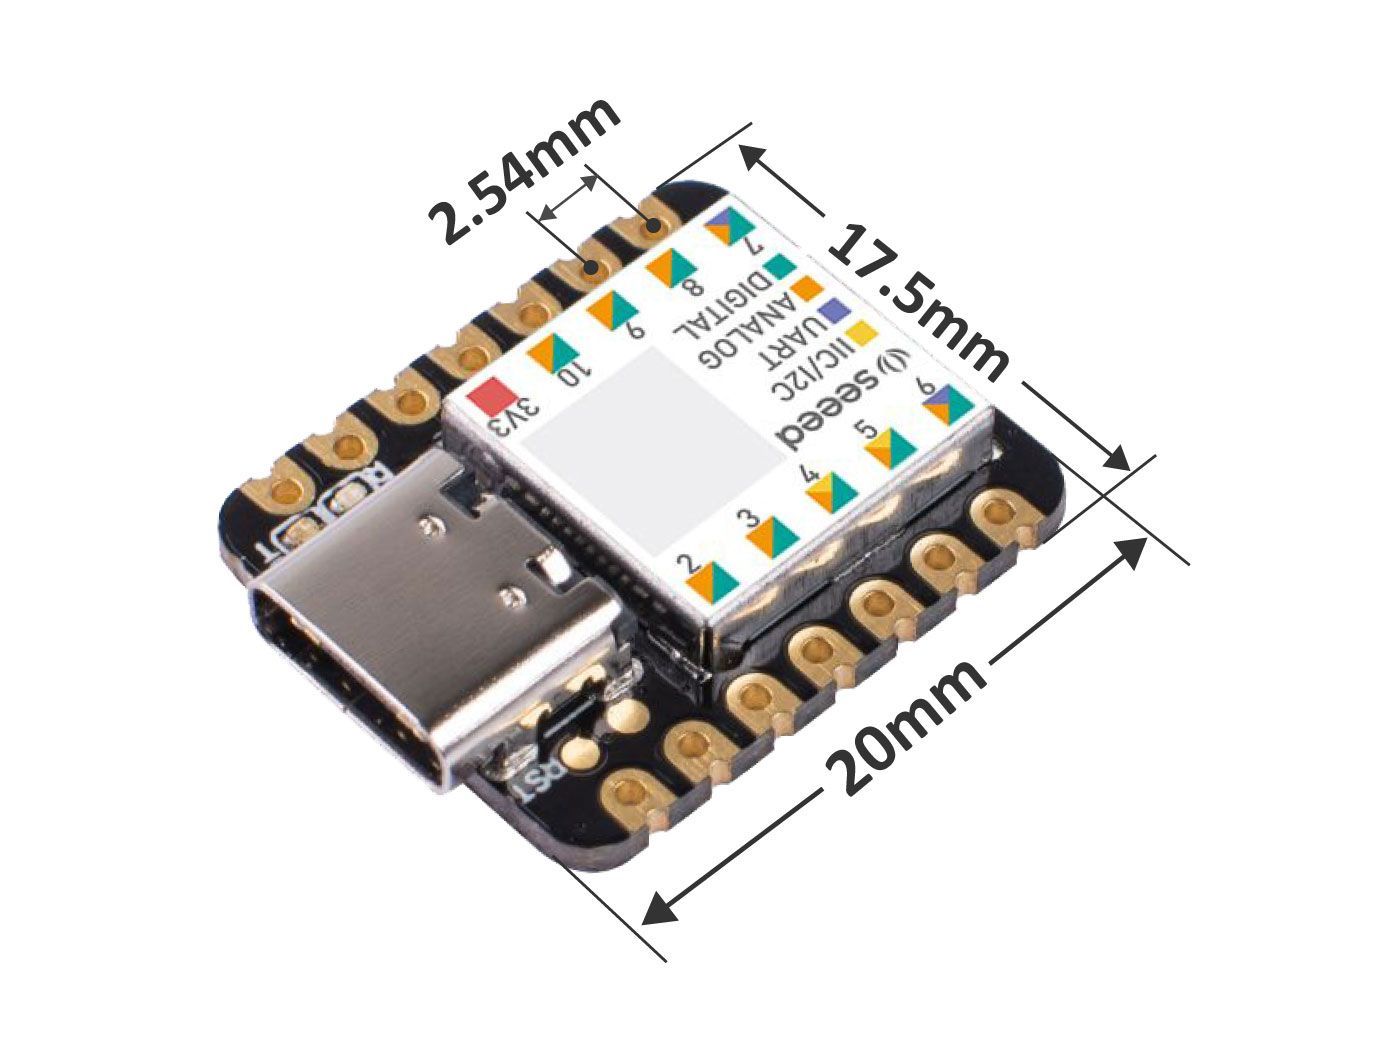
| Size | 20x17.5x3.5mm (See Figure 1) |
Benchmark Test
We performed a benchmark test on the XIAO Board, by using the Paul Stoffregen's CoreMark GitHub project. The Table 2 shows a comparison with a few other Arduino or Arduino compatible boards which we have available on our toolbox. The results were rounded up to the closest integer value.
| Board | Result |
|---|---|
| Teensy 4.0 (ARM Cortex-M7 @600MHz) | 2309 |
| Teensy 3.2 (ARM Cortex-M4 @72MHz) | 167 |
| Arduino Due (AT91SAM3X8E @84MHz) | 91 |
| Arduino Zero (ATSAMD21G18 @48MHz) | 53 |
| Seeeduino XIAO (ATSAMD21G18 @48MhZ) | 52 |
| Arduino Mega (ATmega2560 @16MHz) | 8 |
As expected, in terms of the CoreMark benchmark, the little XIAO board behaves very similar with Arduino Zero, which also uses the ATSAMD21G18, 32-Bit ARM Cortex M0+ chip familly.
Note: A CoreMark test with an Arduino UNO Rev 3 was not possible, due to its low amount RAM that causes instability problems, and as a result the board keeps restarting itself every a few seonds.
The Power Consumption
Not necessarily each WoT/IoT project is battery powered, nor require a very low power consumption. However, we still need to think on our "little and still green planet" and use the limited resources responsible. Believe it or not, but a few extra mW does really matter - as of 2020 over 30 billion IoT devices are estimated as being used all over the world and connected to the Internet. In addition, there are many other such devices not (yet) connected to the internet. Elementary math show us that even 1mW (milli watts!) extra power consumption, actually means 30MW (mega watts!), and this just for the IoT devices connected to the Internet. So, yes, it does really matter to keep the power consumption reduced at the minimum, at least when that is possible.
In our opinion, this little XIAO guy, was well designed, and the power consumption is quite low for what this board can do. The MCU plays a key role, since it takes most of the power juice, but the hardware design is also an important factor. Many other Arduino compatible boards, use additional components or modules (sometimes justified, sometimes not really), thus increasing the power consumption of the board. For example, various sensors or wireless communication modules (WiFi, Bluetooth, RF, etc) are incorporated in some boards. While this is not every time the case, and by this we mean "having the board filled up with as many goodies as possible" in terms of hardware features, such features are in fact underused. As a result, they don't only take additional space on the board and increase the price but also produce a bit more CO2 using additional power when the board is powered, and of course at the time of being produced by the factory.
While we are really fans of the ESP8266, ESP32 and alike boards, they do not represent the answer to all our problem. Sure, it makes a lot of sense to use the powerful MCU and the included WiFi or Bluetooth features when needed, but for example these are a very bad replacement for a simple IoT temperature monitoring node, where an ATMega 328 MCU (e.g., Arduino Nano), a temperature / humidity sensor (e.g., DHT11 / DHT22) and a nRF24-based transmitter/receiver (e.g., nRF24L01+) make much more sense. Using the Arduino Nano, a nRF24L01+ module and a DHT11 / DHT22 sensor the power consumption will go around [email protected] (so, about 150mW). This can be reduced even more by using 3.3V instead of 5V and an efficient LDO, thus going down to about [email protected] (so about 132mW). The Arduino Nano can be successfully replaced with the XIAO board, and the power requirements do not increase, actually it can go down if your project is well designed. An ESP32 or ESP8266 will be less efficient by a few factors of magnitude, even with the WiFi and/or BT deactivated.
The XIAO Board uses the XC6206. According to the datasheet of this voltage regulator, the maximum input voltage is 6V, so this will also be the maximum voltage that it can be supplied to the board either via the contact pads located on the back of the board (see Figure 3) or via the USB-C connector (which normally shall provide about 5V). It can output a maximum of 200mA of current, but we do not recommend more than 150mA to avoid overheating it. Moreover, keep in mind that up to about 25mA may be used by the MCU and the other components (LEDs, voltage regulator, etc), so the conservative current available for the user, to power sensors and any other devices is about 120mA. Moreover, keep in mind that the GPIO pins can only supply a little amount of current. According with the specs, this can go up to 7mA (source) or 10mA (sink) per pin, but for this a special bit/flag shall be enabled, and this also comes with some other disadvantages. The real "by default" current for each GPIO pin is 2.5mA (sink) or 2mA (source) per pin.
Keep this in mind: you can easily burn up a GPIO or even destroy the MCU completely if the source or sink current is larger than 2.5mA (sink) or 2mA (source) even if this happens for very short amount of time. Something like half of a second is more than enough to destroy your MCU or GPIO if the current is exceeded. By setting the Output Driver Strength bit (DRVSTR) to 1 for a specific pin, a maximum of 10mA (sink) and 7mA (source) can be obtained. More details about this are available on the section 37.9 I/O Pin Characteristics of the SAMD21D datasheet document.
Using our digital multimeter UNI-T model UT71C we made some measurements to see how this board performs in terms of power requirements. In Table 3 we provide the obtained results.
| Conditions | Results | Details |
|---|---|---|
|
Input voltage via
USB-C port:
4.95V Sketch: LED Blink every second Sketch |
[email protected] (61.38mW) | Measured when the blinking LED is ON. |
|
Input voltage via
USB-C port:
4.95V Sketch: the CoreMark benchmark |
[email protected] (66.82mW) | Measured during the benchmark runtime. |
|
Input voltage via
USB-C port:
4.95V Sketch: Sleep Mode with RTCZero Library |
[email protected] (10.89mW) | The MCU itself uses less than 1mA (the RTC and some other services are active). The rest is used by the power LED and the voltage regulator. |
Get Started with the XIAO board and the Arduino IDE
The XIAO board can be programmed by using the Arduino IDE and the "Arduino Programming Language". Well, to be clear here, there is no such thing as "Arduino Programming Language", it is really just C/C++, but there is a trend to use this metaphor whenever the Arduino core and custom libraries are used. There following steps will guide you to get started with your first Arduino sketch and having the XIAO user controlled LED blinking.
- Download the official Arduino IDE software if you didn't already. We also recommend to use the latest version available to avoid various issues caused by old bugs and to get access to the newest features.
- Add Seeeduino to your Arduino IDE. For this, use the "File > Preference" menu item and copy/paste the following URL https://files.seeedstudio.com/arduino/package_seeeduino_boards_index.json into the "Additional Boards Manager URLs" input field.
- Use the "Tools > Board > Boards Manager..." menu item, and in the new open window, search and install the "Seeed SAMD Boards". After this step we recommend to restart your Arduino IDE.
- Open the Blink sketch by using the "File > Examples > 01.Basics > Blink" menu item.
- Select the "Tools > Board > Seeed SAMD (32-bits ARM Cortex-M0+ and Cortex-M4) Boards > Seeeduino XIAO" menu item. This will instruct Arduino IDE what to do when you like to compile and upload a sketch.
- Select the "Tools > Port > COMxx (Seeeduino XIAO)" menu item. COMxx represents the COM port to which the XIAO board connects too.
- Now use the "Sketch > Upload" menu item to have the sketch compiled and uploaded to your board. It may take a up to one minute to complete this task, in particular when the sketch was not yet compiled and your PC is not the fastest one in the world.
If all went well, when the upload is completed your XIAO shall have the yellow user LED blinking once every second.
Note: in our experience, most of the time this board can't be switched to programming mode automatically. What you shall do is to use some tweezers or a conductive tool (e.g., a small flat head screwdriver) and to touch the two reset pins from the front of the board - these are located near the A0/D and A1/D2 GPIO pins (see Figure 2). Notice that you have to repeat this twice, in a short time (i.e., twice in about one second). After that, the board enters boot-loading mode (the green and yellow LEDs must be on at this point) and the uploading of your sketch will work as expected. Notice that this will also switch the used COM port, thus you have to select the new one by using the "Tools > Port > COMxx (Seeeduino XIAO)" menu item.
Some Final toughts
We played with the little XIAO for a few months by now and we have used it in a few of our projects already. It is for sure not perfect, and there are a few issues with it, like the need to manually enter boot-loading mode every time when it needs to be reprogrammed, the low amount of current available to each GPIO or the incompatibility with a few Arduino libraries. The 11 GPIO pins are also not enough for projects that requires more than just one or two sensors, a switch and eventually an I2C or SPI display. In many of our projects however, the board filled up the requirements and being so tiny, it fitted with ease in almost any case of the IoT/WoT nodes. Therefore, whenever we do not need WiFi / BT, a faster MCU or more GPIO pins, we do consider using XIAO before jumping further with our searches. The low price is also a big plus, in particular when you need a lot of such boards and the total price can rise up very fast.
Do we recommend the XIAO board? Yes, it is a very good candidate for many low power projects. It is also very small and very cheap, so you don't need to break the bank when you need a few of them for your project.
Is is perfect candidate for any project? No, unfortunately it is not. Among the reasons, an important one is the reduced number of GPIO pins. In this case, you either have to look further for another board, but then expect a larger sized board and very likely a higher price too, or you think on using a "GPIO multiplier", such as the MCP23017 IC, which will give you 8 I/O pins with 25mA per pin at the expense of the I2C pins of your board.
What's next?
The the "Green Balcony" project is work in progress. Among others, it makes use of a few Seeeduino XIAO boards, used to control the watering of the plants as well to monitor various aspects, such as the water tank level, temperature and to keep an eye on the light intensity variation. Since the balcony is populated with very different species of plants (blackberry, raspberry, a small fig tree and various flowers), it is important and interessant as well to observe the light variation. This will help to decide the optimal position for the plants, to have them as "happy" as possible, and get their smile when drinking the morning coffee in the green seven square meter mini-garden. Since only solar power is used for this project, keeping an eye on the light intensity provides also indications about the optimal positioning of the 10W solar panel used to collect the "free" energy from the sun.
Note: yes, we know that there is no such thing as free energy. We use here the term of free energy only as a metaphor, with the meaning of energy that is not taken from the grid. In term of costs, this actually means, the costs of the equipment used to collect it (solar panel, charge controller, battery, wires, etc) - theoretically no other costs are involved, practically, we'll see...
Stay tuned, a set of tutorials providing step-by-step implementation instructions of the "Green Balcony" project will be published soon!


